Trip Recording
This article was last updated in September 2023
Overview
Trip recording plugin is a special tool designed to record your routes, movements, and workouts. This feature allows you to reuse, modify, update, and share your tracks with friends.
Trip recording plugin is used to create new tracks, display recorded tracks on the map and work with existing records. It helps you analyze data such as speed, ascents, descents, or terrain features during your trip. The route can be recorded while navigating or simply on the go.
- Android
- iOS
Setup
To start recording tracks, you need to make the following settings:
- Enable the Trip recording plugin.
- Configure Trip recording settings for the required profile.
- If needed, add Trip recording widgets to the screen.
After setup is complete, you can make new records, display and manage tracks on the map, change their appearance, edit the route, add waypoints, etc.
New track recording
In the OsmAnd app with the Trip recording plugin, you can start recording your track using several suggested options.
- Usе the Distance/Start-Stop widget.
- Use the Trip recording item (Android) in the Main menu of the OsmAnd app: Menu → Trip recording.
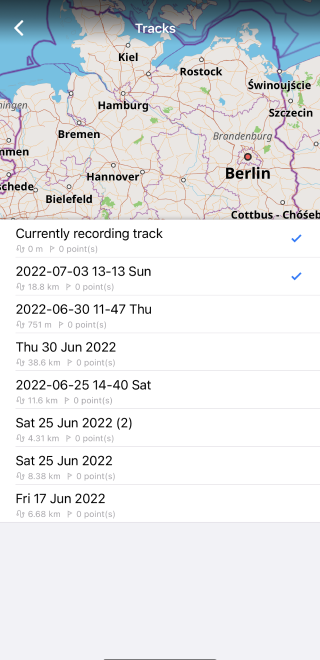
- Use the Start recording button (Android) / record button in the Currently recording track field (iOS) in My Places section of the Main menu: Menu → My Places → Tracks tab.
- Use an application launcher (Android).
Recommendations:
- For this options to work properly, we recommend that you allow OsmAnd to get the precise location of your device.
- Troubleshooting: your iOS device may temporarily suspend or stop apps from running in the background.
For more information about all troubleshooting, read the Track recording in the appropriate documentation section.
Start a Dialog
- Android
- iOS
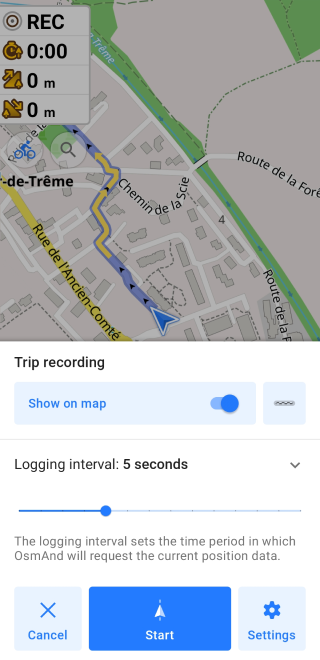
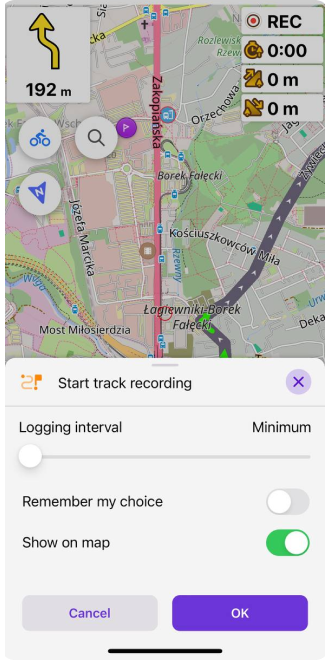
Start dialog opens, if the Show start dialog option is enabled in the settings section of the Start dialog box.
Start dialog opens, if the Remember my choice option is not toggled on.

- Logging interval (Android/iOS) is used to set the frequency of the requests sent to the GPS sensor to detect and place a new point on the track route.
- The Line (Android) icon opens the Track Appearance options, which allow you to customize the display of the track on the map. When a track is saved, the selected appearance is saved with the track, and the next time it is turned on, it will start displaying the same way it did the previous time.
- The Settings (Android) menu allows you to adjust the recording parameters. See Trip recording settings for more information.
- If Remember my choice (iOS) is toggled on, all following track recordings automatically start, without additional settings or the OK button. Before you record a new track, you need to restart the Trip recording plugin for the settings to start displaying again.
Launcher (Android)
![]()
![]()
To start recording a new track, you can use the Start Recording icon on the screen of your Android device, as shown in the screenshots for an example. Long pressing the icon opens a context menu with Start Recording option.
Use a long press on Start Recording in the context menu of the OsmAnd icon to add it as a separate icon on your device screen.
Current track recording
For Stop / Save / Pause:
- To stop the recording, tap the corresponding button in the Distance/Start-Stop widget widget dialog box.
- In the Android version, you can stop recording by tapping the Trip recording Main menu item.
Overview screen
- Android
- iOS
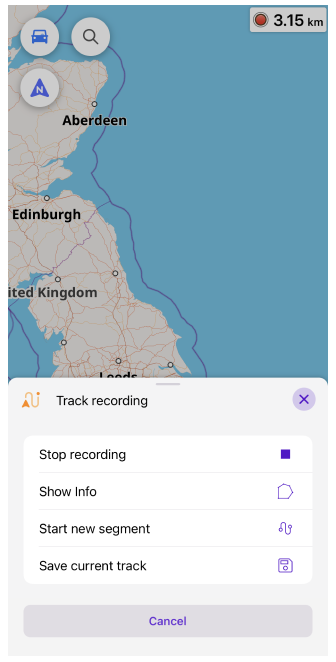
The Android version of the OsmAnd app has a separate menu for the Track recording context menu, while the iOS version has the Currently recording track track context menu.
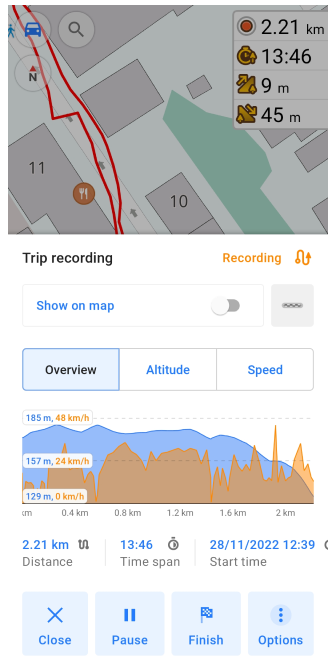
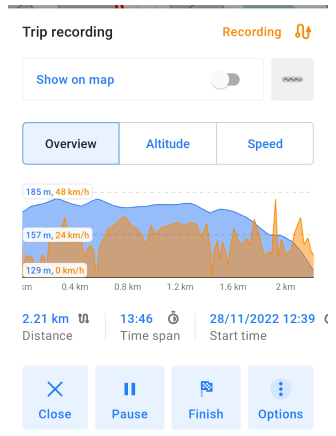
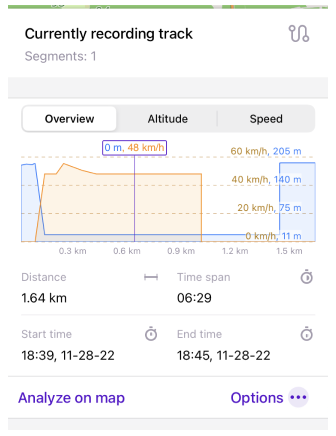
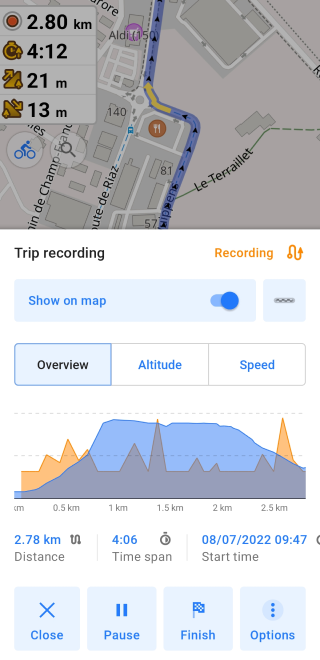
The graphs that are built while the current track is being recorded visually display information about the track. All values on the graph are indicated either for the whole route or only for the selected interval (when scaling).
- The right (Android) / left (iOS) side of the graphs contains data about the highest, average and lowest values.
- The tabs contain information: Overview - distance and speed, Altitude - elevation and grade, Speed - speed in current moment.
- The graph can be scaled.
- You can use two-finger movement to zoom in and out for a more detailed view.
- If you want to see information at a specific point, you can tap the graph and a pointer with the values will appear.
| Overview. This tab opens a graph with speed/altitude information on the distance and additional track data. The information section "Overview" contains the values: Distance, Time span, Start time, End time. (Android / iOS versions below) |
  |
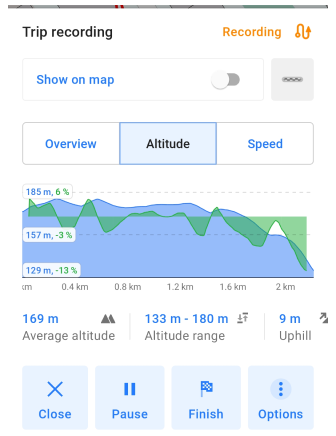
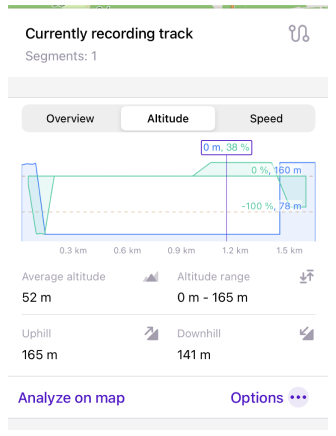
| Altitude. This tab opens a graph with information about the altitude/grade of current trip recording and additional data about the trip. The information section "Altitude" contains the values: Average altitude, Altitude range, Uphill, Downhill. (Android / iOS versions below) |
  |
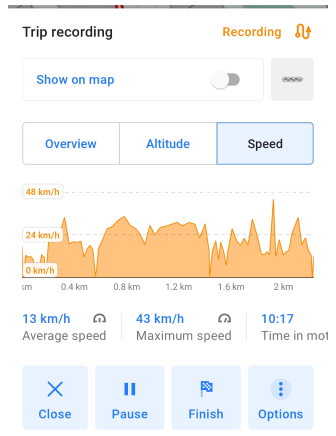
| Speed. This tab opens with speed info on distance and additional track data. The information section "Speed" contains the values: Average speed, Maximum speed, Time in motion, Distance corrected. (Android / iOS versions below) |
 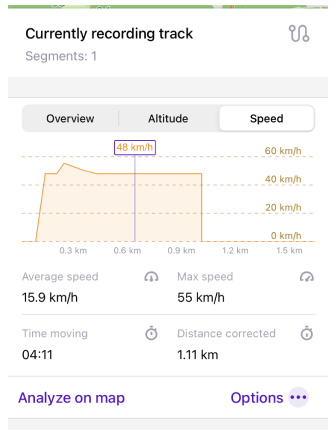 |
Tap the links to get more information about the Tracks context menu, about the Appearence of a track on the map, and about adding track points to the current track. To make necessary changes to the track, for example Rename track, use the Options tab of the Tracks Context menu.
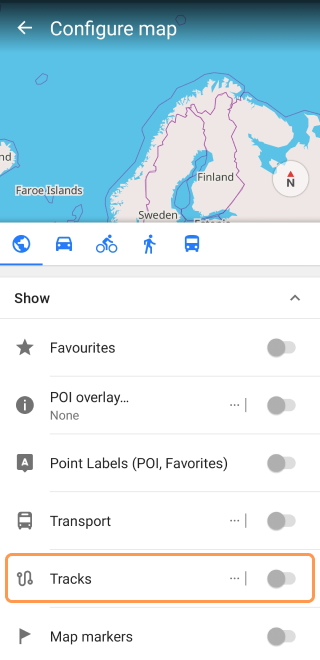
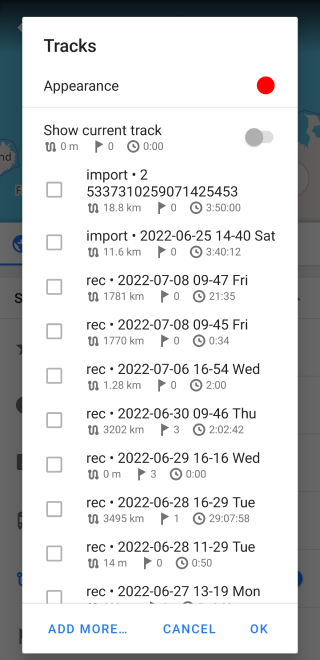
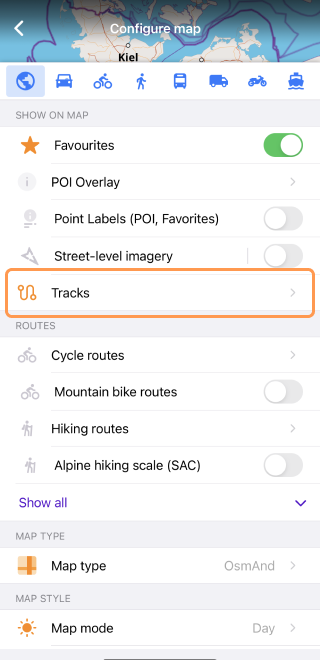
Show on the map
You can choose which tracks are displayed on the map and which are not. To do this, you can use the option Show on map or Visible on map in Menu → My Places → Tracks tab, or use Menu → Configure map → Tracks.
- Android
- iOS
Recorded GPX file
OsmAnd records tracks in a file in the GPX format according to the following structure: file > track > segments > points.
- One point has a number of attributes: coordinates, speed, altitude, heading.
- Points are grouped into tracks.
- The next point after the gap makes up a new segment.
- Both segments and tracks are shown with the Start and Finish icons on the map.
<extensions>
    <gpxtpx:TrackPointExtension>
        <gpxtpx:hr>107</gpxtpx:hr>
        <gpxtpx:atemp>107</gpxtpx:atemp>
        <gpxtpx:cad>107</gpxtpx:cad>
    </gpxtpx:TrackPointExtension>
</extensions>
| Parameter | Description |
|---|---|
trkpt | Point shows the detected geographical location of the user. Every point is provided with the latitude and the longitude as base attributes of the detected location. |
trkseg | Segment groups points between gaps detected as absence of any movement within one recording. |
lat | Latitude is one of the geographical coordinates to identify the location with. |
lon | Longitude is one of the geographical coordinates to identify the location with. |
ele | Elevation is the hight of the point above the sea, calculated in meters. |
time | Timestamp is the date and time of when the point was recorded. |
hdop | HDOP is one of the terms of GPS accuracy, abbrev. from Horizontal Dilution of Precision, determined as the error caused by the relative position of the GPS satellites. True HDOP is a dimensionless number, but the "HDOP" value stored in OsmAnd GPX tracks is actually "horizontal accuracy", calculated in meters. Beware that this is non-standard. |
speed | Speed is the rate, in meters per second, at which the user is detected to be moving. |
heading | Heading is the direction to where the front panel of the vehicle/device is pointing. The heading direction is calculated in degrees and determined with the angle between the direction the front panel is pointing and the course towards which the vehicle/device is intended to move. In navigation, the difference may exist due to the drift caused by the air, water, skidding, slipping, etc. |
speed_sensor | Speed is used to record data from external sensors, providing information about your current speed while cycling. GPX file format |
cadence | Cadence is used to record data from external sensors, showing the number of pedal turns per minute. GPX file format. |
power | Bicycle power is used to record data from external sensors, measuring the power generated by pedaling. GPX file format |
atemp | Air Temperature is used to record data from external sensors, displaying information about the air temperature (water temperature is not supported). GPX file format |
hr | Heart Rate is used to record data from external sensors, showing the number of heart beats per minute. GPX file format |
Recording settings
Before you start recording, you need to configure the Trip recording plugin.
- Trip recording plugin settings are individual for each profile.
- The recording settings may differ depending on the type of movement. For example, driving, cycling, or Nordic walking may require different settings.
- To ensure smooth and convenient recording for future use, you may need to make changes to the way you capture and record location points. This may be by changing the frequency of recording or the formatting of the data, such as the number of points or the use of spaces.
- All profiles are configured in the app's global settings.
- Before you can proceed with customization, you must select a specific profile, and then in the settings section of that profile, find the profile intended for Trip recording.
- Android
- iOS
| Parameter | Description |
|---|---|
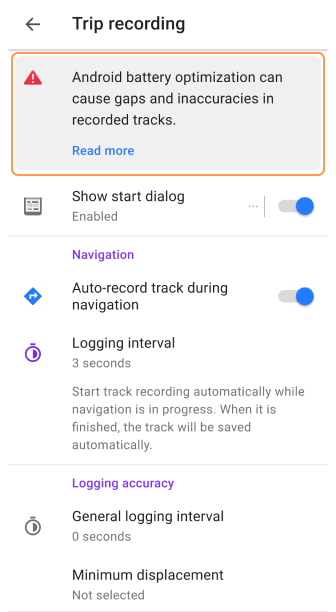
| Battery optimization dialogue (Android) | Select an optimisation setting. To prevent the app from asking you the next time you make a selection, tap the Don't ask anymore button. |
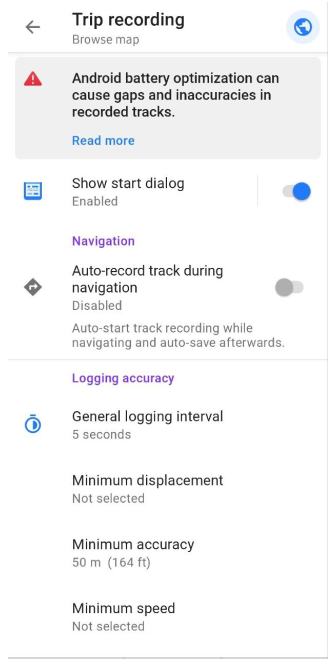
| Show start dialog (Android) | If this feature is enabled, you can select the required settings before starting recording, and then tap the Start button. If this feature is disabled, the recording will start automatically. |
| Auto-record track during navigation | When enabled, the track is automatically recorded during navigation and auto-saved in Menu → Trip recording tab. Note: Trip recording uses the battery energy and continues to run in the background when the screen is closed. |
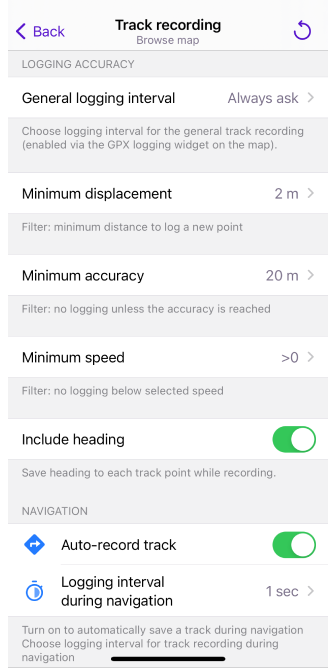
| General logging interval | This is the frequency of location requests after which location points are recorded in the track. The default value is 5 seconds. Options from 0 seconds to 5 minutes are available. |
| Minimum displacement | This filter allows you to avoid additional data recording when there is little or no movement detected. It also improves the appearance of the tracks on the map without additional processing. Side effects: Rest periods are not recorded at all or are recorded by one point. Minor movements (e.g., to the side of the road to mark a possible turn in your path) may also be filtered out. Note: Your file will contain less information for post-processing, and at the same time can potentially save GPS artifacts caused by bad reception or chipset effects. Recommendation: Set 5 meters displacement if you don't want to record minor details of your route and you don't need additional data about your rest period. |
| Minimum accuracy | This filter allows you to record only points measured with a minimum "accuracy" indication (in meters/feet, as reported by Android for your chipset). Accuracy is the proximity of measurements to the true position, and is not directly related to precision, which is the scatter of repeated measurements. Side effect: As a result of filtering by accuracy, points may be entirely missing for e.g. below bridges, under trees, between high buildings, or with certain weather conditions. |
| Recommendation | It is hard to predict what will be recorded and what not, it may be best to turn this filter off. Remark: If GPS had been off immediately before a recording, the first point measured may have a decreased accuracy,so in our code we may want to wait a second or so before recording a point (or record the best of 3 consecutive points, etc.), but this is not yet implemented. |
| Minimum speed | This is a low-speed cut-off filter to not record points below a certain speed. This may make recorded tracks look smoother when viewed on the map. Side effect: Your track will be missing all sections where the minimum speed criterion was not met (e.g. where you push your bike up a steep hill). Also, there will be no information about periods at rest, like breaks. This has effects on any analysis or post-processing, like when trying to determine the total length of your trip, time in motion, or your average speed. Recommendation: Try using the motion detection via the logging minimum displacement filter (B) first, it may produce better results, and you will lose less data. If your tracks remain noisy at low speeds, try non-zero values here. Please note that some measurements may not report any speed value at all (some network-based methods), in which case you would not record anything. Remark: speed > 0 check: Most GPS chipsets report a speed value only if the algorithm determines you are in motion, and none if you are not. Hence using the > 0 setting in this filter in a sense uses the motion detection of the GPS chipset. But even if not filtered here at recording time, we still use this feature in our GPX analysis to determine the Distance corrected, i.e. the value displayed in that field is the distance recorded while in motion. |
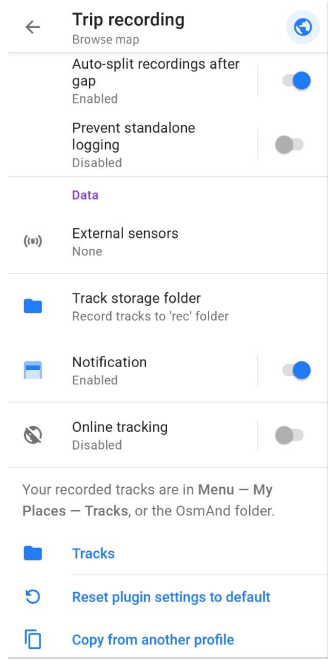
| Auto-split recordings after gap | If enabled, a new segment will automatically start after a 6-minute gap; a new track will automatically start after a 2-hour gap; and a new file will automatically start when the date has changed. The gap is determined as the absence of any point being recorded. Points can, or cannot be detected, and not recorded. It might happen due to a number of reasons as well as the current configuration of the Trip recording functionality. For example, the GPS signal is weak because of the current weather conditions and therefore, the location is not detected and not recorded. Or, the speed of the movement gets below the threshold, and thus, the location is actually detected, but not recorded. Such gaps in recorded data can be used to generate a new segment on the same track, or a new track in the same file, or a new GPX file within one recording identified as single start/stop actions performed once at a time. |
| Prevent standalone logging (Android) | If enabled, Trip recording will automatically stop, when the OsmAnd app is stopped, and the notification bar of Android shows no indication of OsmAnd's working in the background. |
| Include heading | If enabled, the heading is saved into the GPX file for every point. The heading is the direction to where the front panel of the vehicle/device points to. It is determined with the angle between the direction where the front panel points to and the course towards which the vehicle/device is intended to move. In navigation, the difference may exist due to the drift caused by the air, water, skidding, slipping, etc. |
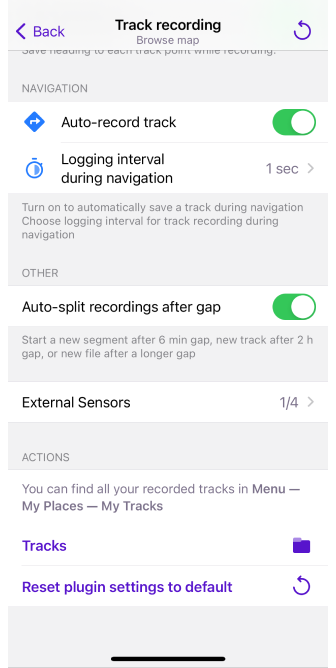
| External sensors | Data from External sensors, such as: Heart Rate, Bicycle Power (Android only), Bicycle Cadence, Bicycle Speed, and Temperature (Distance data from sensors is not added to the track in Android and iOS systems) is written to a GPX file during track recording. Displayed only when the External Sensors plugin is enabled. |
| Track storage folder (Android) | All tracks are stored in the Menu → My Places → Tracks tab. You can set the internal structure of this folder by selecting one of the following options: 1) Record all tracks to the Rec folder. 2) Group all tracks into appropriate folders of the month, such as Rec/yyyyy-mm. |
| Notification | When enabled, trip recording messages are displayed in the system notification area of the device. The notification area opens when you swipe from the top of the screen to the bottom, and closes when you swipe in the opposite direction. Messages are designed to notify you of all actions to start/stop the trip recording feature and are especially useful when the automatic track recording option is enabled during navigation. Once a message is sent, it is displayed in the notification area. The sent message can be cleared if it is not needed. The visibility of a sent message does not depend on the state of the application: whether it is running in the background, in the foreground, or closed. |
| Online tracking (Android) | It is real-time monitoring of your current location. If the option is enabled and the recording is in progress, the Distance/Start-Stop (REC) widget turns green instead of red, and each point is transmitted to a specified URL. The Web address field is for entering the URL using the parameter syntax: lat={0}, lon={1}, timestamp={2}, hdop={3}, altitude={4}, speed={5}, bearing={6}, eta={7} (unix time - to arrival), etfa={8} (unix time - to first intermediate point or finish point), eda={9} (distance in meters - to arrival or to a marker), edfa={10} (distance in meters - to first intermediate point or finish point). The Tracking Interval parameter is used to determine the frequency of sending location points. The options can be selected from 0 seconds to 5 minutes. The Time Buffer parameter sets the period of time that location points are saved if there is no Internet connection. |
| Tracks | This is a quick re-direction to the folder: Menu → My Places → Tracks tab. |
| Reset plugin settings to default | You can reset all profile settings to the default ones that you had when you installed the application. |
| Copy from another profile (Android) | You can copy the Trip recording plugin settings from another profile. |
Baterry optimization

With this feature, you can configure battery optimization for OsmAnd so that you don't lose access to your location when the app runs in the background while navigating or recording a track.
- Battery optimisation settings. Opens Android settings, where you can change them.
- Don't ask anymore. Closes the dialog box and the application does not show it again.
- Close. Closes the dialog box, but it will display next time.
Widgets
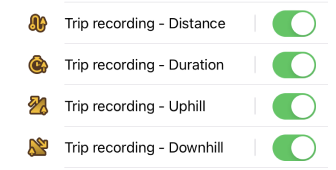
You can use widgets to view brief information about the track recording on the screen. Such as Distance, Duration, Uphill and Downhill.
To start using Trip recording widgets, you need to make all of the following settings:
- Enable the plugin.
- Configure Trip recording for the required profile.
- Add the necessary Trip recording widgets to the screen. This setting is individual for each profile.
Add Recording widget
The Trip recording widget is used to quickly check if you are recording or not, and for quick access to the recording settings and information about it. The widget is added automatically when the Trip recording plugin is enabled.
You can delete or add the Trip recording widgets and other widgets by following:
- Android
- iOS
Menu → Configure screen → Left panel/Right panel → Trip recording

Menu → Configure screen → Right panel, toggle on/off.
Distance (Start-Stop)
- Android
- iOS
Menu → Configure screen → Left panel/Right panel → Trip recording, Distance
Menu → Configure screen → Right panel → Track recording → Distance
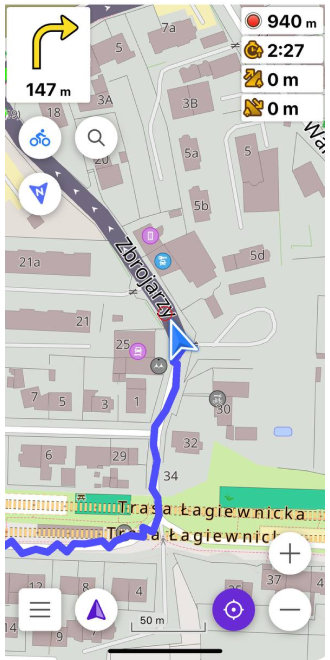
When the selected widgets appear on the map, you can tap any of them and additional information about the track and the ability to interact with it will appear.
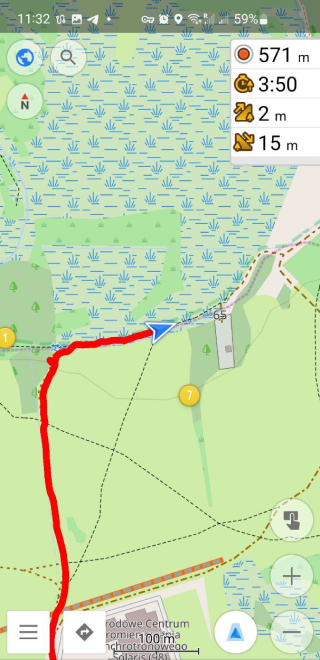
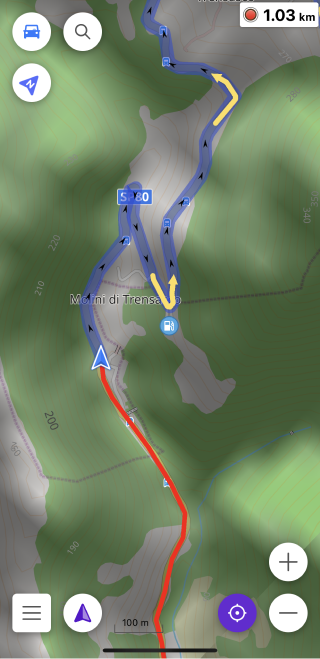
- Distance widget shows the distance of the currently recorded trip.
- The widget is added automatically when Trip recording plugin is enabled, but you can hide the widget in the Configure screen menu.
- If the Show start dialog option is disabled in the Trip recording plugin settings and the widget is active, tapping it still opens the Trip recording dialog box.
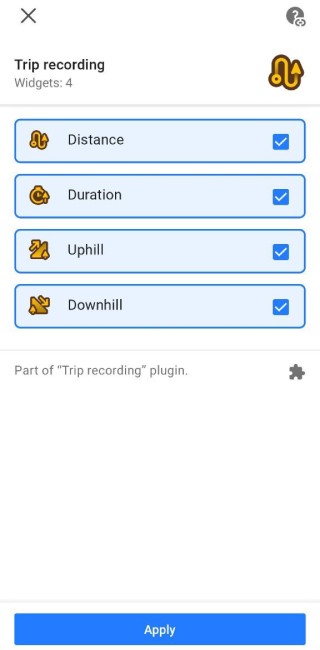
In general, the Trip recording plugin for Android consists of 4 widgets. Distance/Start-Stop is the main widget, when you tap it opens the Trip recording dialog. If the Show start dialog option is disabled in the Trip recording plugin settings and the widget is active, tapping it still opens the Trip recording dialog box.
The Duration, Uphill and Downhill widgets provide additional information about the trip.
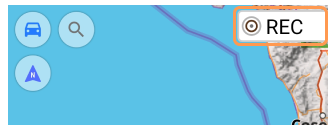
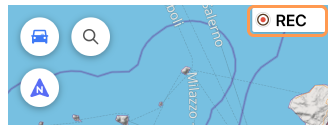
| Distance/Start-Stop: shows the distance of the current trip recording. It is added automatically with the Trip recording plugin enabled, but you can hide the widget in Configure screen menu. The widget has 3 different views: Recording, Paused, Inactive. |
| If the Trip Recording Plugin settings have the Show Startup Dialog option enabled, tapping on the inactive widget will open the Trip recording dialog. If it is disabled, the recording will start immediately. |
Duration, Uphill, Downhill
- Android
- iOS
Menu → Configure screen → Left panel/Right panel → Trip recording, Duration, Uphill, Downhill
Menu → Configure screen → Right panel → Track recording, Duration, Uphill, Downhill
| Duration: shows the time, in hours and minutes, of the current trip recording. |
| Uphill: shows the sum of all the climbs of the current trip recording. |
| Downhill: shows the sum of all descents of the current trip recording. |
If you have several widgets selected, Duration, Uphill, or Downhill, you don't need to switch between them by closing the dialog box that opens. The dialog box is the same for all these widgets.