Navigation on the Web
Visão Geral
Use Navegação na Web para construir uma rota no mapa e visualizar a orientação por turnos. Ela calcula uma rota para o modo de viagem selecionado, mostra a distância e o tempo esperados, e permite que você verifique as mudanças de elevação e as curvas próximas. Você pode ajustar finamente a rota nas configurações de Navegação (por exemplo, permitindo ou evitando certos tipos de estrada ou usando parâmetros do veículo) e usar múltiplos pontos de rota quando necessário.
Iniciar uma Rota
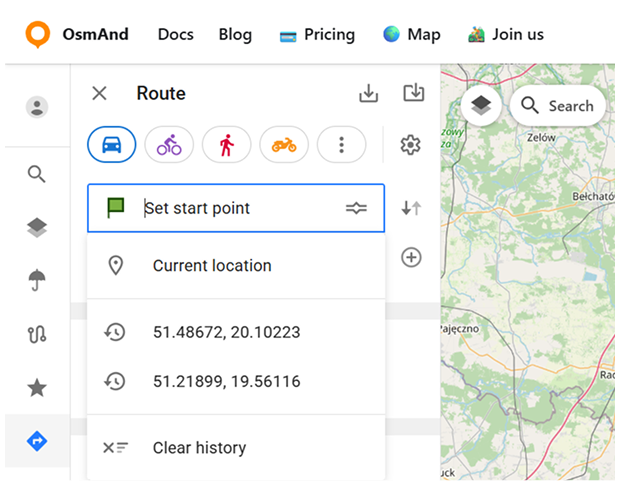
No estado vazio, a Navegação o convida a adicionar pontos de rota: Clique no mapa para definir os pontos de Início e Destino.
Os pontos de rota podem ser fornecidos a partir do painel de Rota. Quando você seleciona Definir ponto de início ou Definir destino, o campo mostra sugestões como Localização atual e pontos usados anteriormente do histórico. Você pode remover as sugestões salvas usando Limpar histórico.
Você também pode inserir coordenadas diretamente nos campos de pontos de rota usando o formato latitude, longitude (por exemplo, 48.23737, 24.40830). Outros formatos de coordenadas ou links compartilhados podem não ser sempre reconhecidos. Se uma localização não for analisada corretamente, tente convertê-la para lat,lon ou encontre o lugar usando a pesquisa.
A Navegação segue um fluxo simples: o primeiro ponto se torna o Início, e o próximo ponto se torna o Destino. Assim que ambos os pontos são definidos, a rota é calculada e exibida no mapa.
Gerenciar Pontos de Rota
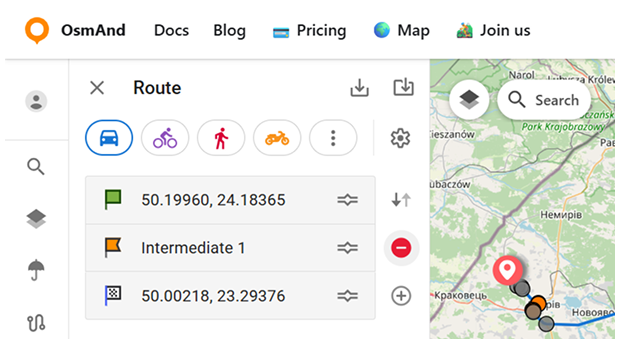
Você pode expandir uma rota além de Início → Destino adicionando pontos intermediários. Use o botão mais (+) ao lado da lista de pontos para adicionar um ponto intermediário (um novo ponto é inserido acima do Destino). Os pontos intermediários podem ser removidos usando o botão menos (–).
Trocar Início e Destino — troca o Início e o Destino mantendo os pontos intermediários inalterados. A ação é marcada com um ícone mostrando duas setas em direções opostas.
Perfil de Roteamento
No topo do painel de Rota, você pode escolher um perfil de roteamento para sua rota. Um conjunto de perfis comumente usados é mostrado como quatro ícones. Para acessar mais opções, abra o menu de três pontos ao lado dos ícones de perfil. Ele expande a lista completa de perfis disponíveis.
Os perfis de roteamento no Planejador da Web usam as mesmas regras e configurações de roteamento que no aplicativo móvel OsmAnd. Para detalhes sobre como as rotas são calculadas e como os parâmetros de roteamento funcionam, consulte OsmAnd Routing.
Quando você alterna o perfil, a Navegação atualiza a rota para corresponder ao modo de viagem selecionado.

Configurações de Navegação
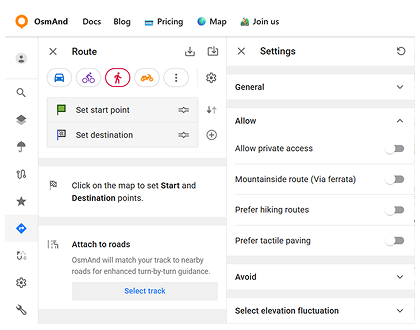
Para ajustar como as rotas são calculadas, abra Configurações usando o ícone de engrenagem no painel de Rota (para configurações de navegação no aplicativo móvel OsmAnd, consulte aqui). As configurações são agrupadas em seções que você pode expandir/recolher. O conjunto de seções e opções depende do perfil de roteamento selecionado, então você verá parâmetros diferentes para diferentes modos de viagem.
Seções típicas incluem:
- Geral — opções específicas do perfil (por exemplo, no perfil de carro você pode ver alternadores como Caminho eficiente em combustível e Entrega de mercadorias).
- Permitir — opções que permitem tipos específicos de estrada ou caminho ao rotear .
- Evitar — opções que excluem certos tipos de estrada ou situações da rota (por exemplo, evitando pedágios, balsas, autoestradas, túneis, etc.).
- Parâmetros do Veículo — disponível para perfis baseados em veículo. Permite especificar restrições do veículo (como dimensões/peso), que podem influenciar o roteamento em estradas restritas.

Anexar Trilha
O bloco Anexar a estradas permite que você use uma trilha GPX existente como base para a navegação. O OsmAnd Web combina a trilha com estradas próximas para fornecer orientação por turnos.
Quando você clica em Selecionar trilha, o navegador abre um seletor de arquivos onde você pode escolher um arquivo .gpx do seu computador. Após selecionar uma trilha:
- A trilha é exibida no mapa e usada para calcular a rota.
- Resumo da rota (distância e tempo) é mostrado no painel de Rota.
- O arquivo selecionado aparece sob Trilha selecionada (com o nome do arquivo da trilha).
- Você pode remover a trilha anexada usando o botão menos (–) ao lado de Trilha selecionada.
Detalhes da Rota
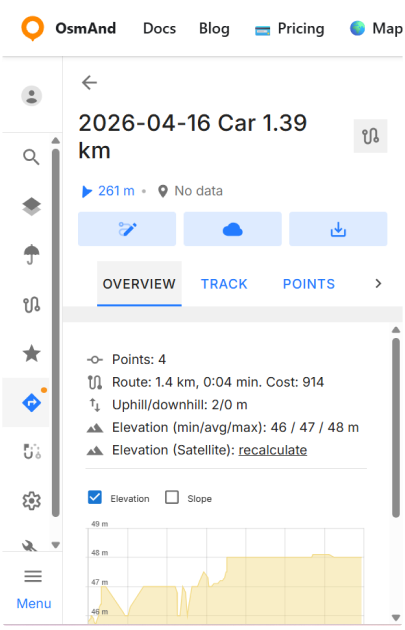
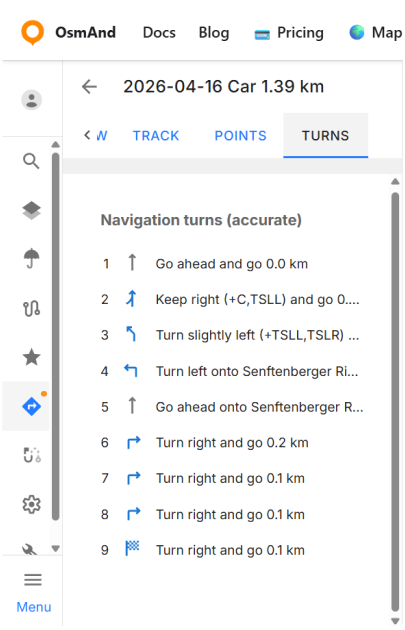
Quando uma rota é calculada, o painel mostra um resumo básico (distância, tempo, subida/descida) e um botão Detalhes. Use Detalhes para abrir a visualização da rota com múltiplas abas. As abas principais incluem Visão Geral, Trilha e Pontos. A aba Curvas está disponível via a seta (›) na barra de abas.
Visão Geral resume a rota e dados de elevação:
- Pontos — o número de pontos de rota usados para construir a rota.
- Rota — distância e tempo.
- Subida/Descida — ascensão e descida totais.
- Elevação (mín/média/máx) — estatísticas de elevação para a rota.
- Elevação (Satélite) — recalcula os dados de elevação da trilha usando dados de terreno (DEM) e atualiza o gráfico de elevação.
Abaixo do resumo, o gráfico de elevação ajuda você a inspecionar o perfil da rota. Você pode alternar Elevação e Inclinação, e usar o controle deslizante sob o gráfico para focar em uma parte específica da rota.
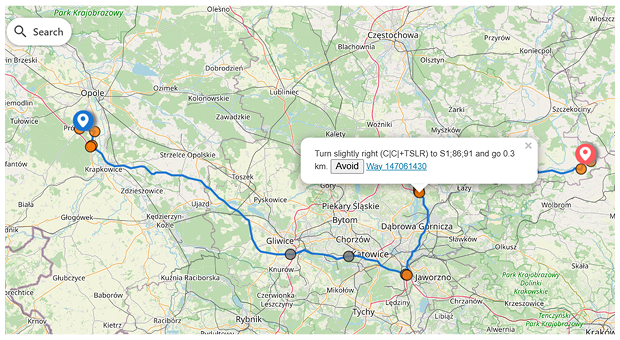
Use Curvas para orientação por turnos. A rota também é marcada com círculos laranjas ao longo da linha. Clique em um círculo para abrir um pop-up com a instrução de navegação correspondente. O pop-up também pode incluir:
- Evitar — evita esse segmento específico.
- ID da Via — um link para a via OSM subjacente para essa parte da rota.
Você pode ajustar finamente a rota diretamente no mapa arrastando marcadores de rota para um lugar diferente. Quando você clica e arrasta um marcador para outra estrada (ou para uma localização próxima) e depois o solta:
- O OsmAnd Web recalcula a rota para passar pela nova posição.
- O marcador movido é convertido em um novo ponto intermediário.
- O novo ponto intermediário aparece no painel de Rota como um ponto adicional inserido acima do Destino, e o resumo da rota é atualizado de acordo.
- Você pode gerenciar o ponto via adicionado da mesma maneira que outros pontos intermediários.
Baixar e Salvar
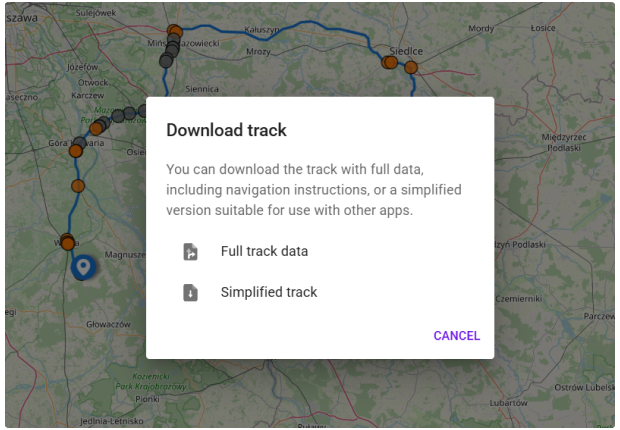
Use Baixar para exportar a rota como uma trilha. A caixa de diálogo de download oferece duas opções: Dados completos da trilha — inclui dados completos, incluindo instruções de navegação. Trilha simplificada — uma versão mais leve que é mais adequada para uso com outros aplicativos.
Se você planeja abrir o GPX em aplicativos de terceiros, escolha Trilha simplificada para melhor compatibilidade. Isso ajuda a evitar casos em que outro aplicativo pode exibir um segmento incorreto após a importação.
Qual é a diferença:
- Dados completos da trilha podem incluir informações de rota/navegação além da geometria da trilha (útil se você quiser manter instruções de navegação ou reeditar a rota no OsmAnd).
- Trilha simplificada exporta um GPX mais limpo destinado a outros aplicativos, removendo dados de rota/navegação e deixando apenas o formato da trilha. Waypoints são preservados ao exportar uma trilha simplificada.
Você pode salvar a rota como uma trilha usando Salvar na Nuvem / Carregar para OsmAnd Cloud. Isso abre uma caixa de diálogo onde você pode confirmar a salvação em trilhas na nuvem, editar o Nome, opcionalmente escolher uma Pasta, então Salvar ou Cancelar. Se você não estiver conectado, Salvar na Nuvem / Carregar para OsmAnd Cloud abre a página de Preços.
Compartilhar uma Rota
Para compartilhar a rota, copie a URL. Exemplo: https://osmand.net/map/?start=43.792163,11.215324&finish=43.852850,11.121941&via=43.812605,11.134644&type=osmand&profile=bicycle#13/43.8200/11.1352
Ao abrir um link compartilhado, a rota é restaurada no mapa. Se necessário, você pode alterar o perfil de roteamento manualmente no painel de Rota.